Showing posts with label recipes. Show all posts

Tuesday, October 4, 2011

Apple Chips

After apple picking, we have quite a few apples that were calling to me.  As much as I would love to make an apple pie, cake or another delicious-but-not-waistline-friendly dessert, I decided to take a stab at apple chips.  And boy, did the house smell delicious.  This is a very simple recipe, but certainly healthy & delicious.  In fact, these apple chips didn't last 18 hours in our house.  They are all gone!


Ingredients:

  • Apples, washed and quartered
  • juice from half a lemon
  • bowl of ice water
  • ground cinnamon
  • sugar, if desired

Directions:

  1. Preheat oven to 225 degrees F. Line a baking sheet with parchment and place a footed cooling rack on top of the parchment.  Fill a bowl with ice water and squeeze the juice from half a lemon.
  2. Cut each apple into quarters, removing the seeds.  Slice apple quarters thinly. (I used a mandolin on the thickest setting)  Place the slices in the water as soon as they are cut.  Keep them in the water until the oven has been preheated. Once the apples are ready to bake, blot dry and arrange in a single layer on the baking sheet.  Sprinkle with cinnamon, sugar, or a combination of, if desired.  I did use a very light sprinkling of sugar, but honestly, will forgo the sugar next time.  The cinnamon was more than enough for flavor
  3. Bake the apples at 250 degrees for about 2 1/2 to 3 hours.  The apples will darken and shrink.  Let the apples cool.  The chips should crisp up.  If they are not dry & crispy, return to the oven for another 30 minutes.  
  4. Store in an air-tight container.  Chips should last about five to seven days, but they will probably all be eaten before that. 


About 4 apples worth of apple chips!

Sunday, October 2, 2011

Blueberry Muffins

I have found it really hard to find an easy, but healthy muffin recipe.  My daughters love muffins for breakfast and they are a great option when we run out of the house in the morning to get to the gym.  Over the past few months, I have tried quite a few different blueberry muffin recipes and none of have fulfilling.  Either they aren't moist enough, or just aren't tasty enough.

Well, I took to my friend Lauren's blog (why I didn't start there first is beyond me!) and used her Very Berry Muffin recipe.  (P.S. Lauren - looking at two year old posts was very fun.  I cannot believe how big R. is now in comparison to two years ago.)

Very Berry Muffins
(c) Lauren's Kitchen
Ingredients

  • 4 tbsp butter (melted and cooled)
  • 1 cup flour
  • 1 tsp cinnamon
  • 1 tsp baking powder
  • 1/4 tsp salt
  • 1/2 cup sugar (plus additional for sprinkling)
  • 1 egg
  • 1/4 cup milk
  • 1 1/2 cup frozen mixed berries (thawed and divided) -- I used only blueberries.
Directions
Preheat oven to 375 degrees and spray muffin tin with cooking spray.

Combine flour, cinnamon, baking powder and salt; set aside. In a small bowl combine 1/2 cup berries and milk and mash well. In a medium bowl, cream butter and sugar; add egg and beat well. Gradually mix in dry ingredients by hand. Mix in berry/milk mixture, followed by remaining berries and mix until just combined.

Using two spoons pour batter into prepared muffin tin, filling each chamber 3/4 full. Sprinkle top of muffins with sugar. Bake for 22-28 minutes or until a toothpick inserted in center comes out clean.

I loved this recipe because of it's simplicity and versatility.  I wasn't planning on making muffins last night, but am so very glad I did.  The house smelt divine while the muffins were baking and they were the perfect breakfast while we were trying to get out of the house for apple picking this morning.  

Sweet Potato & Corn Chowder

Since the temperature in NJ has been more autumn like the past few days, we wanted to add a soup to this week's menu.  It takes a lot for me to absolutely love a soup, especially as a main event for dinner.  As we were going through our usual sites and books for recipes, I decided to look for a corn chowder recipe and I stumbled across a sweet potato & corn chowder.

Absolutely delicious!  I made a few variations to the recipe and am glad I did.  This was an absolutely delicious and filling chowder and will definitely be added to the frequently made recipes.


Ingredients:

  • 1 tsp. olive oil
  • 1 small onion, diced
  • 3 cloves garlic, minced
  • 1 red pepper, diced (I added this to the recipe)
  • 10 ounces frozen corn
  • 3-4 small sweet potatoes, peeled and diced
  • 1 cup water 1 cup chicken broth (I changed)
  • 1/4 tsp. paprika
  • salt & pepper to taste
  • 2 tbs. flour
  • 2 cups 1% milk

Directions

  1. Saute onion, red pepper, and garlic in oil over medium heat, for two minutes
  2. Add corn, potatoes, chicken broth, salt, pepper, and paprika. Bring to a boil on high heat.
  3. Once it boils, reduce heat to medium. Cook, covered, about 10 minutes or until potatoes are tender.
  4. In a small bowl, whisk flour into 1/2 cup of the milk, until smooth.
  5. Gradually add the flour and milk mixture to the vegetables, stirring constantly.
  6. Continue to stir as you add the rest of the milk, cooking until soup boils and thickens.
  7. If desired, use a stick blender for about 5-10 seconds to blend.  (I added this step as well.  I think it gave it that extra blend of the flavors melding together!)

Friday, April 8, 2011

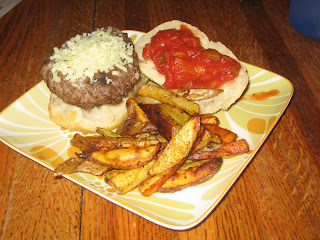
Fajita Burgers

We planned on having burgers this week, but the weather hasn't been very cooperative to grill outside on the days we planned them.  Just a plain ol' cheeseburger wasn't sounding extremely appealing tonight especially since they would be baked in the toaster oven so I turned to FoodNetwork for some ideas....

and was very happy with my decision, as was my husband.

Beef Fajita Burgers by Rachael Ray

  • 1 1/3 pounds ground sirloin
  • 2 tablespoons Worcestershire sauce 
  • 1 tablespoons chili powder
  • 1 1/2 teaspoons ground cumin
  • 2 to 3 tablespoons fresh picked thyme leaves, several sprigs
  • Several drops hot sauce - I used Crystal
  • 1 tablespoon grill seasoning (recommended: Montreal Steak Seasoning by McCormick)
  • Extra-virgin olive oil, for drizzling
I baked them in the toaster oven on 350ºF for about 25 minutes.  These were cooked thoroughly and perhaps just a little too well done for my taste.  But the beef was juicy and quite delicious.  I topped them with a little bit of cheese & salsa (I love, love, love Wegman's Pineapple Salsa).  Accompanied with baked seasoned fries, this was one deliciously unexpected meal!


Tuesday, February 22, 2011

Fajitas

When we make fajitas, we make the whole sha-bang.  Marinated meat to rice and beans plus all the garnishes makes for delicious and well-balanced meal.  

Marinade
1lb. of steak
Juice of 3 limes
2 gloves of garlic, minced or finely chopped
1/4 c. cilantro, washed & chopped
1tbsp. ground cumin
2tsp. ground chili powder
Salt & Pepper to taste

Marinate the steak or chicken for at least 1 hour or up to 5 hours. Broil steak in toaster oven for about 30 minutes- less for a more rare piece of steak & longer for a more well done piece.. This marinade is also great for chicken.  Once the meat is cook, slice into strips.

Onions & Peppers
Slice onions and peppers and place in a skillet with 1 tbsp of EVOO on medium-high heat.  Sprinkle with Creole seasoning.  If Creole seasoning is not in your pantry, dash with salt, pepper, garlic powder, ground cayenne pepper & ground paprika.  Cook onions and peppers until translucent. 


Rice & Beans
2 c. basmati rice
32oz. chicken stock
2 tsp. Adobo seasoning (or more to taste)
15oz. can of Red Kidney beans
1 tbsp. fresh cilantro, chopped

Cook rice according to directions.  Sub chicken stock for water and add adobo seasoning and a can of kidney beans. 


Warm tortillas in the microwave by stacking on a microwaveable plate and alternate with a damp paper towel between each tortilla.  Microwave for approximately 45 seconds.  

Assemble fajitas and add garnishes of your choice. Some of our favorites are Crystal hot sauce, shredded cheddar cheese, sour cream, and avocado.  


Thursday, February 17, 2011

Grilled Balsamic Chicken Wraps

Usually our grilled balsamic chicken is served with a veg & couscous, but this week we decided to change it up a little.  We decided to add some bleu cheese & a balsamic tomato basil salad to a wrap to be a little different.  

Balsamic Marinade
  • Equal parts Balsamic vinegar & EVOO 
  • Splash of agave syrup
  • Two gloves fresh garlic, finely chopped or minced
  • Dried oregano
  • Salt & pepper
Place chicken (I used three chicken breasts) in the marinade for at least 1 hour prior to baking/grilling, but can be up to 4 hours.  Bake in oven at 350ºF for 20-25 minutes or until chicken is cooked thoroughly.  Dice chicken into bite size pieces.

Tomato-Basil Salad
  • 3 grape tomatoes, chopped
  • 1/4 cup fresh basil
  • 1/2 red onion, chopped
  • 1 garlic clove, finely chopped
  • salt & pepper
  • drizzle of EVOO
  • 2-3 tbsp. (or more for taste) balsamic vinegar
Assemble wraps with chicken, salad & bleu cheese and enjoy!
Balsamic Marinade


Chicken Wraps ready to be devoured!

Wednesday, February 16, 2011

Chicken Ropa Vieja

The first time I had Ropa Vieja was at one of our favorite restaurants, Cuban Pete's in Montclair.  When I found the recipe below, I was very excited to try this as I tried a few others, but nothing was quite as tasty.  

Very easy to make and absolutely delicious, this recipe will surely make it into our regular rotation.  The only modification that I made was the amount of cumin... I loaded up on the cumin.  

Chicken Ropa Vieja
From Skinnytaste.
  • 3 chicken breast halves
  • 1 small onion, quartered
  • 1 tomato, quartered
  • 1 carrot, peeled and chopped
  • 2 cloves garlic, peeled
  • 1 tbsp olive oil
  • 1 small onion, thinly sliced
  • 1 small green bell pepper, seeded and thinly sliced
  • 1 small red bell pepper, seeded and thinly sliced
  • 1/4 cup dry white wine
  • 1/2 cup tomato sauce
  • reserved broth
  • 1 tsp cumin, or more to taste (I like a lot)
  • garlic powder
  • salt and pepper to taste
Place chicken, onion, tomato, carrot, and 2 cloves of garlic into crock pot. Add water to cover, and set to high for 4 hours until the chicken is tender. If cooking on the stove,cook on medium-low, and simmer until the chicken is tender, 30 to 40 minutes. Placethe chicken into a bowl and shred it into strips using a fork; set aside. Reserve the liquid.

In a large deep skillet, heat olive oil over medium heat. Add the garlic, onions, green peppers, and red peppers. Cook about 3 to 4 minutes. Stir in chicken, tomato sauce, white wine, and about 3/4 cup of the reserved broth to create a nice sauce. Seasonwith cumin, garlic powder salt, and pepper. Cover and simmer on low for about 10 minutes more adding more broth and seasoning if needed. Makes 4 cups.

Served over basmasti rice & topped with shredded cheddar! 


Monday, February 14, 2011

Recipe Swap :: Artichoke Chicken

One of the message boards that I am on had a recipe swap organized by one of our members.  We all had to submit a recipe and then randomly received one back.  This swap's rules were that it had to be a crockpot meal OR prepped and prepared within 30 minutes.

I submitted a recipe from Rachael Ray's No Recipe Zone for Chicken Pot Pie that Dave and I loved!  

The recipe that I received was Artichoke Chicken.  I was really excited to get a recipe that was not something that we would have normally chosen to cook.  It was also a very quick and easy dinner to prepare and toss in the oven.  Those are our favorite kind of dinners.  Artichokes are one ingredient that you will rarely find in our kitchen.  I am very intimidated by them, but when they are prepared for me I absolutely love them.  

ARTICHOKE CHICKEN
INGREDIENTS
1 (15 ounce) can artichoke hearts, drained and chopped
3/4 cup grated Parmesan cheese
3/4 cup mayonnaise
1 pinch garlic pepper
4 skinless, boneless chicken breast halves
Preheat oven to 375 degrees F (190 degrees C).
In a medium bowl, mix together the artichoke hearts, Parmesan cheese, mayonnaise, and garlic pepper. Place chicken in a greased baking dish, and cover evenly with artichoke mixture.
Bake, uncovered, for 30 minutes in the preheated oven, or until chicken is no longer pink in the center and juices run clear.
I forgot to take a picture of the dish!  I have to keep my camera in the kitchen so I can take a quick pic but usually the fragrance of our dinner is making our mouths water and we dig in and then it's too late!
We really enjoyed this dish.  The only modification that I would make next time is to bread the chicken in panko or other breadcrumbs just to give it a little crunch!  Overall, we really enjoyed this dish especially because it was something different for us.

Sunday, January 30, 2011

Cheesy Chicken Shells

Who says you can't have stuffed shells and still lose weight?  This recipe has been in our repertoire for almost six years as I received this recipe from a Weight Watchers at Work mtg back in 2006.  And we've been enjoying this since...

We have been using large shells instead of manicotti shells, as I made that mistake and didn't catch it until a few years later when I finally noticed that it called for manicotti shells. We tried them recently in manicotti shells and I wasn't a huge fan even though it was the same exact ingredients just changed the type of pasta.

Cheesy Chicken Shells
©Weight Watchers

12 jumbo uncooked manicotti shells
1 1/2 c. favorite tomato sauce
2 medium egg whites
4 oz. chicken breast, cooked & diced
1 tsp. garlic powder
1 3/4 c. ricotta (recipe calls for fat free, but I used part skim)
1 tbsp. oregano
3/4 c. shredded mozzerella (again, it calls for fat free, but I used part skim)

Preheat oven to 350°

Cook manicotti shells in boiling water according to package directions.  Drain and rinse in cold water.  Set aside.  Coat a 9x13 pan with spray.  Spread 1/2 cup of sauce evenly over the bottom.

For filling:
In a large bowl, stir together egg whites, ricotta, chicken, garlic powder & seasoning.  Stir in 1/4 cup each of mozzerella & parmesan cheeses.

Spoon mixture into shells.  Place in dish.  Spread remaining sauce on top.  Sprinkle with remaining cheeses.  Bake 30 minutes.

3 shells per serving.  9 pts per serving (old WW).

Thursday, January 13, 2011

Shepherd's Pie, the Weight Watchers Way

I came across this recipe on a message board that I frequent and being my husband is a huge fan of Shepherd's Pie I figured we would give this a try.  I, myself, have never had Shepherd's Pie so I didn't have anything to compare this to.  This was absolutely delicious and definitely going into our recipe box.

I will update with a picture the next time we make it.  I forgot to take a picture!

2 large uncooked potatoes, peeled and cut into 2-inch pieces
1/4 c. fat free sour cream
1tbsp reduced calorie margarine
1/8 tsp salt, or to taste
2 tsp olive oil
1 c. onion, chopped
2 celery stalks, diced
2 medium carrots, diced
1 lb. uncooked ground turkey breast
3tbsp. all purpose flour
1 tbsp. rosemary (fresh) or 1 tsp. dried
1/2 tsp salt
1/4 tsp. black pepper
2 c. chicken or beef broth


Instructions:
Preheat oven to 400ºF.
  • Place potatoes in a large saucepan and pour in enough water to cover potatoes. Set pan over high heat and bring to a boil; reduce heat to medium and simmer 10 minutes, until potatoes are fork-tender. Drain potatoes, transfer to a large bowl and add sour cream and margarine; mash until smooth, season to taste with salt and set aside.
  • Meanwhile, heat oil in a large skillet over medium-high heat. Add onion, carrots and celery; cook until soft, about 3 minutes. Add turkey and cook until browned, breaking up the meat as it cooks, about 5 minutes. Add flour, rosemary, thyme, salt and pepper; stir to coat. Add broth and bring to a simmer; simmer until mixture thickens, about 3 minutes.
  • Transfer turkey mixture to a 9-inch, deep-dish pie plate. Spread mashed potatoes over top and using the back of a spoon, make decorative swirls over the top. Bake until potatoes are golden, about 30 minutes. Slice into 6 pieces and serve.